Nymphs
NEW PATTERNS WINTER 2020
The theme to start 2020 is really an everyday theme for me. As much time as I am on the water I have to make the most of my time at the vise, both tying flies for guiding and for selling to clients. A fly needs to be relatively simple, tied from a few quality ingredients that are easily obtainable and readily available, and able to be tied in 5 to 7 minutes or less. Many flies, good ones, I can tie in half that amount of time. Guiding is a high stakes game, and its one where you can have 12 of a fly that is working great and get into some fish or have some less than perfect casters in the boat and suddenly find an hour later that you are running out. Not good if its the fly that seems to be working well.
So here are there flies you can churn out in a hurry. One is an old standby tied on a new hook style, or in a new fly style so to speak. Its a skinny Nelson….Jigged. A great fly on all trout waters. The most complicated tie of the three below, but still quick and its a top producer. The next one is a Jigged Olive Caddis larva…. a bare bones simple tie that gets it done. Deadly effective , both on our tailwaters, and our freestones. Also a great fly for tiny water as well. The last one, well its a modified Zebra which I tie in sizes 16-20….and in this color it approximates a Baetis nymph in size 16-20, a Caddis larva/microcaddis larva in sizes 14-20, a midge in sizes 16-20, and a Blackfly larva in sizes 18-22. In other words, it looks like a whole lotta stuff. Also why I carry it in three sizes in my box and am never without it. It is a tailwater killer. Its a hard pattern, liked the Jigged Caddis…., that is hard to the feel and bite. But trout love them.
I’m not totally sold on the idea that a fly has to ‘feel’ soft or ‘feel’ natural…..don’t believe this? Then why do some of our best nymph patterns feel everything but that? Copper Johns, Zebra Midges, Wire bodied Stones….all of them are mostly thread and metal…..not a “soft” or “natural” feeling aspect to them at all. So why do trout eat them? Because they feed using many senses but primarily by sight, at least that is my belief. I like wire bodied patterns for many reasons, mostly because they catch fish like crazy, but the shine, added weight, ability to build a skinny profile, durability, etc., all these factors add up to a very effective method and material to building flies.
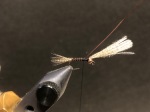
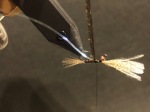
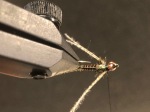
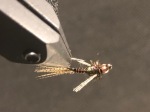
SKINNY NELSON JIGGED
MATERIALS
Hook: Daichii, Orvis, Dohimoto size 14-18 60 degree jig hook
Head: Gold bead 1/16″ for smallest versions, 3/32″ for small versions, and 5/64″ for 16’s and 18’s if desired….. can use Tungsten if desired for a faster sinking pattern
Thread: Black Veevus 14/0
Tail: Wood duck fibers
Body: underbody thread, overbody Ultrawire copper, small
Wingcase: Mylar tinsel, pearl medium, or a few strands of flashabou as substitute
Thorax: peacock herl
Legs: Wood duck fibers
Tying Steps
-

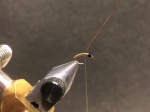
- Start thread behind bead
-

- Lay thread base , tie in wood duck fibers for tail
-

- Wrap forward over fibers all the way to the bead
-

- Tie in Copper wire at rear and create slender thread body
-
- Wrap wire forward in evenly spaced turns and tie off
-

- Turn hook over
-

- Tie in Mylar that will be the wingcase
-
- Tie in peacock herl for the thorax
-

- Wrap forward about 3 turns and tie off
-

- Pull two fibers to near side and wrap thread over them
-
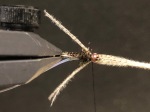
- Pull two more fibers along other side and secure with thread
-

- Trim excess wood duck fibers
-
- Pull mylar over for wingcase , tie down , trim
-

- Tie in Peacock herl
-

- Make two sparse turns for collar and tie off
-
- Whip finish and cement.
-

- View from underside
-

- Top view….finished fly.
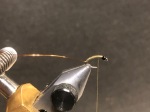
JIGGED CADDIS LARVA
Hook: Daichii, Orvis, Dohimoto size 12-18 60 degree jig hook
Head: Black tungsten bead….Gold bead 1/16″ for smallest versions, 3/32″ for small versions, and 5/64″ for 16’s and 18’s if desired….. can use Tungsten if desired for a faster sinking pattern
Thread: Olive Veevus 14/0 for abdomen, Black Veevus 14/0 for head
Abdomen: Olive Tying thread, tapered, covered w/Deer Creek Diamond Fine UV Resin
Ribbing: Ultrawire Olive, Small
Thorax: Black thread, Built up to back of bead, covered w/Deer Creek Diamond Fine UV Resin
Tying Steps
-
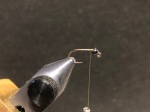
- Start thread just back of the bead.
-

- Create a thread base
-

- Tie in a 4 inch piece of olive wire at the rear.
-

- After building up a tapered body like this, wrap the wire in evenly spaced close together wraps and tie off.
-

- Trim excess wire, whip finish olive thread.
-

- Start the black thread
-

- Use black thread to make a black head behind the bead. Whip finish
-

- Use Deer Creek Diamond fine UV Resin for coating body.
-

- Lay a thin bead of UV from hook eye to end of body
-

- Use a dub needle to spread UV resin out
-

- Use the UV torch for 10 seconds each side to cure the body resin.
-

- The finished killer.
JIGGED CADDIS LARVA
Hook: Daichii, Orvis, Dohimoto size 12-18 60 degree jig hook
Head: Black tungsten bead….Gold bead 1/16″ for smallest versions, 3/32″ for small versions, and 5/64″ for 16’s and 18’s if desired….. can use Tungsten if desired for a faster sinking pattern
Thread: Olive Veevus 14/0 for abdomen, Black Veevus 14/0 for head
Abdomen: Olive Tying thread, tapered, covered w/Deer Creek Diamond Fine UV Resin
Ribbing: Ultrawire Olive, Small
Thorax: Black thread, Built up to back of bead, covered w/Deer Creek Diamond Fine UV Resin
TYING STEPS
-
- Create a thread base
-
- Tie in a 4 inch piece of olive wire at the rear.
-
- After building up a tapered body like this, wrap the wire in evenly spaced close together wraps and tie off.
-
- Trim excess wire, whip finish olive thread.
-
- Start the black thread
-
- Use black thread to make a black head behind the bead. Whip finish
-
- Use Deer Creek Diamond fine UV Resin for coating body.
-
- Lay a thin bead of UV from hook eye to end of body
-
- Use a dub needle to spread UV resin out
-
- Use the UV torch for 10 seconds each side to cure the body resin.
-
- The finished killer.
ALL PURPOSE TUNG ZEBRA
Hook: Daichii 1130 sizes 14-20
Head: Black tungsten bead…. 5/64″ for size 14, 1/16″ for size 16 -22,
Thread: Veevus 14/0 Olive for abdomen, Veevus 14/0 Black for thorax
Abdomen: Veevus 14/0 Olive, Coated with Deer Creek Diamond Fine UV Resin
Ribbing: Ultrawire , Copper, Small
Thorax: Veevus Black 14/0, Coated with Deer Creek Diamond Fine UV Resin
TYING STEPS
-

- Start thread just behind bead.
-

- Tie in small copper wire and wrap back over it
-

- Continue wrapping over wire to hook bend
-

- Make an even thread body, keep it thin
-
- Move thread to thorax area
-
- Wrap wire in evenly spaced turns and tie off as shown
-

- Tie off and whip finish.
-

- Start black thread just back of bead.
-

- Use thread to form a tapered black thorax
-

- Tie off and whip finish
-

- Deer Creek Diamond Fine UV Resin and torch
-

- Apply resin sparingly and spread out w/a dub needle
-
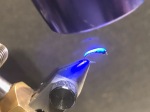
- Use the UV light to cure
-

- The finished killer.

Mac Cheek with a nice float trip brown in the early morning fog….. large fish eat the tiny stuff too.
**************
Other Great Smallish Patterns for Cold Weather Fishing
Midge Emerger Fripple by Curtis Fry
JuJuBee Midge by Charlie Craven
JuJu Baetis by Charlie Craven
*********
Copyright @2020 All Rights Reserved Jeff Wilkins Fly Fishing